Subaru Outback (BR): Air Mix Door Actuator
A: REMOVAL
1. DRIVER'S SEAT
1) Remove the instrument panel lower cover. <Ref. to EI-64, REMOVAL, Instrument Panel Lower Cover.>
2) Remove the bolts, and remove the knee guard panel.

3) Remove the body integrated unit.
CAUTION: Be careful to keep water and other foreign materials away from body integrated unit.
- Remove the harness clip and connector.
- Remove the bolts, and remove the body integrated unit.

4) Remove the air mix door actuator.
- Disconnect the connector.
- Remove the screw, and remove the air mix door actuator.

2. PASSENGER'S SEAT
- Remove the glove box. <Ref. to EI-66, REMOVAL, Glove Box.>
- Remove the nuts, and remove the engine control module (ECM).

3) Remove the air mix door actuator.
- Disconnect the connector.
- Remove the screw, and remove the air mix door actuator.

B: INSTALLATION
Install each part in the reverse order of removal.
C: INSPECTION
1. ACTUATOR LINK
1) Visually check the operating range of the link, and remove the foreign matter if any.
2) Operate the temperature control switch, and check that the link operates normally.
3) If the actuator does not operate normally, check the air mix door actuator unit.
2. CHECK ACTUATOR OPERATION
Preparation tool: Circuit tester
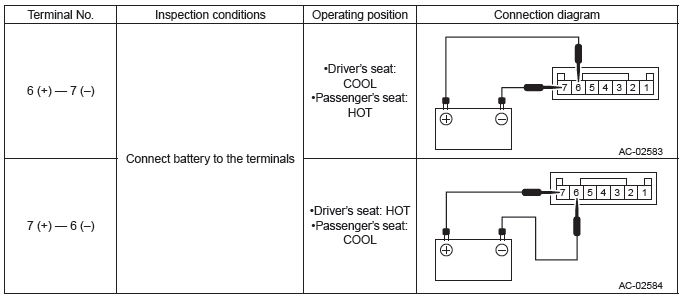
1) Check the actuator operation when battery voltage is applied between the terminals of air mix door actuator.
CAUTION: Disconnect the battery immediately after the actuator stops operation. Otherwise, the motor may be damaged.
2) Check the resistance between terminals of the air mix door actuator.

3) Connect the air mix door actuator connector, turn the ignition switch to ON and check the voltage between terminals of the air mix door actuator.
- Driver's seat

- Passenger's seat

4) Replace the air mix door actuator if it is found defective.
Air Vent Grille
A: REMOVAL
1. CENTER GRILLE ASSEMBLY
1) Remove the center panel assembly.
CAUTION: Do not put your finger on the fin of the air vent grille. Doing so may damage the fin.
- Attach the protective tape (a) to the meter visor.

- Insert a finger into the air vent grille and release the left and right
clips at the top of the center panel.
(A), (B)
- Insert a finger into the air vent grille and release the left and right
clips at the center of the center panel.
(C), (D)
- Release the clips at the bottom of the center panel and remove the center panel assembly.

2) Release the claws, and then remove the center grille assembly.

2. SIDE GRILLE ASSEMBLY RH
1) Remove the instrument panel lower cover. <Ref. to EI-64, REMOVAL, Instrument Panel Lower Cover.>
2) Remove the side vent grille assembly RH.
- Remove the screws.
- Release the claws and clips, then detach the side grille assembly RH.

3. SIDE GRILLE ASSEMBLY LH
1) Remove the glove box. <Ref. to EI-66, REMOVAL, Glove Box.>
2) Remove the side vent grille assembly LH.
- Remove the screws.
- Release the claws and clips, then detach the side grille assembly LH.

B: INSTALLATION
Install each part in the reverse order of removal.
C: INSPECTION
1) Check that the direction and amount of air can be adjusted smoothly. Replace the air vent grille if faulty.
2) Check that the adjustment can be maintained in each position. Replace the air vent grille if faulty.
READ NEXT:
 Heater Duct
A: REMOVAL
1) Remove the front seats. <Ref. to SE-10, REMOVAL, Front Seat.>
2) Remove the instrument panel face assembly. <Ref. to EI-76, REMOVAL,
Instrument Panel Assembly.>
3) Remove
Basic Diagnostic Procedure of HVAC System
A: PROCEDURE
NOTE: When the sunload sensor check is performed indoors or in the shade, it could be diagnosed as sensor having an open circuit. Always perform the inspection in direct sunlight.
Ge
SEE MORE:
Before checking or servicing in the engine compartment
WARNING
● Always stop the engine and apply the parking brake to prevent the vehicle from
moving.
● Always let the engine cool down. Engine parts become very hot when the engine
is running and remain hot for some time after the engine is stopped.
● Do not spill engine oil, en
Checking the oil level in AT models
AT models
1) Yellow handle
1. Park the vehicle on a level surface and stop the engine.
2. Pull out the level gauge, wipe it clean, and insert it again.
1) Upper level
2) Lower level
3. Pull out the level gauge again and check the oil level on it. If it is below the lower l
