Subaru Outback (BR): Rear Wiper Arm
A: REMOVAL
1) Pull up the wiper arm cover.
2) Remove the nut and remove the wiper arm.

B: INSTALLATION
1) Install in the reverse order of removal.
2) Operate the rear wiper once.
3) Align the blade with the marking on the glass.

Tightening torque: Refer to "COMPONENT" of "General Description". <Ref. to WW-4, REAR WIPER, COMPONENT, General Description.>
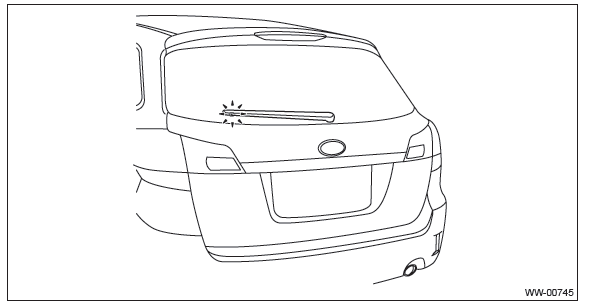
C: ADJUSTMENT
1) Operate the rear wiper once.
2) Align the blade with the marking on the glass.
Rear Wiper Motor
A: REMOVAL
1) Disconnect the ground cable from battery.
2) Remove the rear wiper arm assembly.
- Remove the wiper arm cover.
- Remove the nut and remove the wiper arm.

3) Remove the rear gate trim.
- Remove the rear gate upper trim.
- Remove the claws on the trim edge.
- Disconnect the claws in the center of trim, and remove the rear gate upper trim.

- Remove the rear gate pillar trim.
- Release the claws.
- Remove the claws on the bottom of trim, and remove the rear gate pillar trim.

- Remove the hand grip of rear gate.
CAUTION:
- Be careful not to scratch the trim.
- To protect the trim from damage, attach a protective tape to the tool in use.
- Insert a precision screwdriver (a).
- With the screwdriver inserted, push it down to release the claw and pull it toward you.
- Remove the screws and detach the hand grip.

- Remove the rear gate lower trim.
- Remove the clips on both ends.
- Release the clips and remove the rear gate lower trim.

4) Remove the rear wiper motor assembly.
- Remove the harness clamp, and disconnect the harness connector of the wiper motor assembly.
- Remove the bolts, and then remove the wiper motor assembly.

B: INSTALLATION
1) Install each part in the reverse order of removal.
2) Make sure that the  mark on the
pivot cap faces up, as shown in the figure.
mark on the
pivot cap faces up, as shown in the figure.

Tightening torque: Refer to "COMPONENT" of "General Description". <Ref. to WW-4, REAR WIPER, COMPONENT, General Description.>
C: INSPECTION
1) Connect the battery to the wiper motor connector and confirm that wiper motor operates.
2) Connect the battery to the terminals of connector, then run the motor and disconnect the terminal in mid motion.
3) Connect the battery and confirm that the motor stops at the automatic stop position after the motor operates at low speed again.

Rear Washer
A: REMOVAL
1) Disconnect the ground cable from battery.
2) Remove the rear gate upper trim.
- Remove the claws on the trim edge.
- Disconnect the claws in the center of trim, and remove the rear gate upper trim.

3) Remove the high-mounted stop light.
- Remove the nut.

- Disconnect the connector and remove the high-mounted stop light.

4) Remove the rear washer nozzle.
CAUTION: Before removing, apply protective tape to the body panel and used tools not to damage the rear gate panel.
- Push the claw using a flat tip screwdriver, etc.
- When the washer nozzle lifts up, pull out the nozzle using a clip remover, etc.
- Disconnect the washer hose and remove the washer nozzle.

B: INSTALLATION
1) Install each part in the reverse order of removal.
Tightening torque:
High-mounted stop light assembly: 4.5 N*m (0.46 kgf-m, 3.3 ft-lb)
2) Check the washer nozzle position. <Ref. to WW-45, VISUAL INSPECTION, INSPECTION, Rear Washer.>
C: INSPECTION
1. VISUAL INSPECTION
Check for the following items, and if any malfunction is found, replace the corresponding part.
- Make sure the nozzle and hose are not clogged.
- Make sure the hose is not bent.
2. INSPECTING THE SPRAY POSITION
1) Turn the wiper switch to OFF position.
2) While the vehicle is stopped, check that the washer spray position is as shown in the figure.
3) After inspection, if the spray position is out of the specified range, adjust the position or replace with the new washer nozzle.

READ NEXT:
 Entertainment General Description
A: CAUTION
Before disassembling or reassembling parts, always disconnect the battery ground cable from battery.
When replacing the audio, control module and other parts provided with m
Front Speaker
A: REMOVAL
1. FRONT SIDE SPEAKER
1) Disconnect the ground cable from battery.
2) Remove the front side speaker.
Release the clips and claws, then detach the speaker cover.
CAUTION:
Use a plastic c
SEE MORE:
Engine hood
To open the hood:
1. If the wiper blades are lifted off the windshield, return them to their original
positions.
2. Pull the hood release knob under the instrument panel.
3. Release the secondary hood release by moving the lever between the front grille
and the hood toward the left.
4. L
Keys
1) Master key
2) Submaster key
3) Valet key
4) Key number plate
5) Security ID plate
Three types of keys are provided for your vehicle:
Master key, submaster key and valet key. The master key and submaster key fit
all locks on your vehicle.
● Ignition switch
● Driver’s door
