Subaru Outback (BR): Clutch Fluid
A: INSPECTION
1) Park the vehicle on a level surface.
2) Check the clutch fluid level using the scale on the outside of the reservoir tank. If the clutch fluid level is below "MIN", fill the clutch fluid up to "MAX" level, and make sure that there is no leakage.

- MAX. level
- MIN. level
- Reservoir tank
B: REPLACEMENT
CAUTION:
- Use new FMVSS No. 116 DOT3.
- Cover the air breather with cloth to prevent clutch fluid from being splashed on surrounding parts when loosening the breather.
- Avoid mixing clutch fluid of different brands to prevent fluid performance from degrading.
- Be careful not to allow dirt or dust to enter the reservoir tank.
NOTE:
- During bleeding operation, keep the clutch reservoir tank filled with clutch fluid to prevent entry of air.
- Clutch pedal must be operated very slowly.
- Bleed air from the oil line with help of a co-worker.
- The amount of clutch fluid required is approximately 70 m2 (2.4 US fl oz, 2.5 Imp fl oz) for total clutch system.
1) Remove the collector cover. (turbo model)
2) Remove the air intake boot assembly. (non-turbo model) <Ref. to IN(H4SO)-8, REMOVAL, Air Intake Boot.>
3) Remove the intercooler. (turbo model) <Ref. to IN(H4DOTC)-17, REMOVAL, Intercooler.>
4) Thoroughly drain the clutch fluid from the reservoir tank.
5) Refill the reservoir tank with recommended clutch fluid.
Recommended clutch fluid: New FMVSS No. 116 DOT3
6) Bleed air from the clutch fluid. <Ref. to CL-25, Clutch Fluid Air Bleeding.>
7) Install the air intake boot assembly. (non-turbo model) <Ref. to IN(H4SO)-8, INSTALLATION, Air Intake Boot.>
8) Install the intercooler. (turbo model) <Ref. to IN(H4DOTC)-18, INSTALLATION, Intercooler.>
9) Install the collector cover. (turbo model)
Clutch Fluid Air Bleeding
A: PROCEDURE
NOTE:
- The illustration below is suitable for every model.
Perform the same procedures for the other models.
- Bleed air from the oil line with help of a co-worker.
1) Remove the collector cover.
2) Remove the air intake boot assembly. (non-turbo model) <Ref. to IN(H4SO)-8, REMOVAL, Air Intake Boot.>
3) Remove the intercooler. (turbo model) <Ref. to IN(H4DOTC)-17, REMOVAL, Intercooler.>
4) Fit one end of a vinyl tube into the air breather of the operating cylinder, and put the other end into a clutch fluid container.
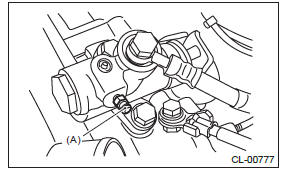
- Air breather
5) Slowly depress the clutch pedal several times and keep it depressed. Open the air breather to discharge air together with the clutch fluid. Release the air breather for 1 or 2 seconds. Next, close the air breather, and slowly release the clutch pedal.
CAUTION: Cover the air breather with cloth to prevent clutch fluid from being splashed on surrounding parts when loosening the breather.

- Operating cylinder
- Vinyl tube
6) Repeat procedure 5), until there are no more air bubbles appearing from the air breather.
7) Tighten the air breather.
Tightening torque: T: 7.8 N*m (0.8 kgf-m, 5.8 ft-lb)

8) After stepping on the clutch pedal, make sure that there are no leaks evident in the entire clutch system.
9) After bleeding the air from clutch system, ensure that the clutch operates properly.
10) Install the air intake boot assembly. (non-turbo model) <Ref. to IN(H4SO)-8, INSTALLATION, Air Intake Boot.>
11) Install the intercooler. (turbo model) <Ref. to IN(H4DOTC)-18, INSTALLATION, Intercooler.>
12) Install the collector cover. (turbo model)
READ NEXT:
 Clutch Pedal
A: REMOVAL
1) Disconnect the ground cable from battery.
2) Remove the collector cover. (turbo model)
3) Remove the air intake boot assembly. (non-turbo
model) <Ref. to IN(H4SO)-8, INSTALLATION,
Clutch Switch
A: REMOVAL
1) Disconnect the ground cable from battery.
2) Remove the instrument panel lower cover. <Ref.
to EI-64, REMOVAL, Instrument Panel Lower Cover.>
3) Disconnect the connector from clu
SEE MORE:
Wheel and Tire System
General Description
A: SPECIFICATION
Offset
P.C.D.
NOTE:
Size and inflation pressure of the standard equipment tire and spare tire for
emergency are described on the "Tire inflation pressure" label attached to the
body side of the driver's door.
1. SERVICE DATA
B: COMPONENT
TPMS & ke
Front fog light (if equipped)
NOTE
It may be difficult to replace the bulbs. We recommend that you have the bulbs
replaced by your SUBARU dealer if necessary.
1. Pull off the fender lining. Refer to “Pulling off the fender lining” F11-7.
2. Disconnect the electrical connector.
1) For left-hand side
2) For right-ha
