Subaru Outback (BR): Steering Wheel
A: REMOVAL
1) Disconnect the negative terminal from the battery, and wait for 60 seconds or more.
2) Set the tire to the straight-ahead position.
3) Remove the driver's airbag module assembly.
- Push in the snap pin using a hexagon wrench or equivalent wrapped with a protective tape to disengage the locks (3 locations).
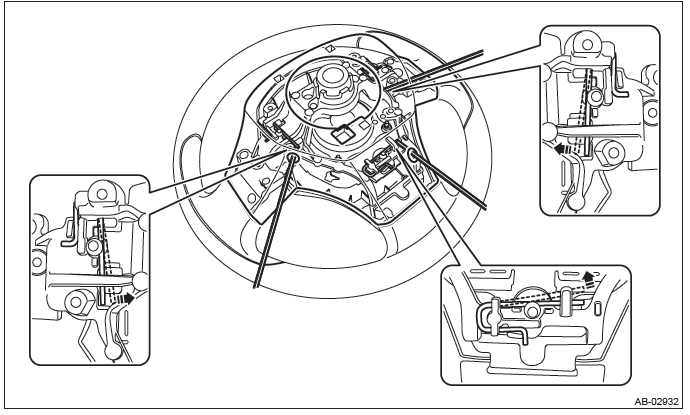
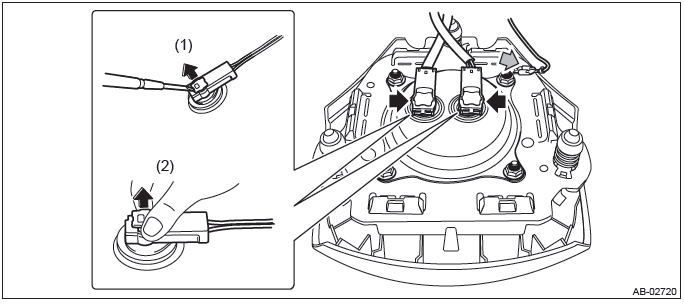
- Disconnect the horn harness and airbag connector and remove the airbag module assembly. <Ref. to AB-21, DRIVER'S AIRBAG MODULE, CURTAIN AIRBAG MODULE & PRETENSIONER, PROCEDURE, Airbag Connector.>
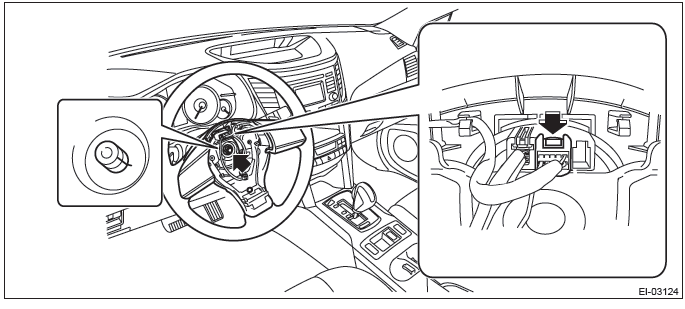
4) Remove the steering wheel.
CAUTION:
- Always use the steering wheel puller for removal to avoid deforming the steering wheel.
- If the steering wheel has been removed, make sure that the roll connector is not turned from the original position.
- Disconnect the connector and remove the nut.
- Put alignment marks and remove the steering wheel.
B: INSTALLATION
WARNING: Always refer to "Airbag System" before performing service on the airbag modules. <Ref. to AB-9, CAUTION, General Description.>
1) Align the center position of the roll connector. <Ref. to AB-101, ADJUSTMENT, Roll Connector.>
2) Install each part in the reverse order of removal.
NOTE: Align the alignment marks on the steering wheel and steering shaft.
Tightening torque: Steering wheel: 39 N*m (4.0 kgf-m, 28.8 ft-lb)
Clearance: Column cover to steering wheel: 2 - 4 mm (0.08 - 0.16 in)
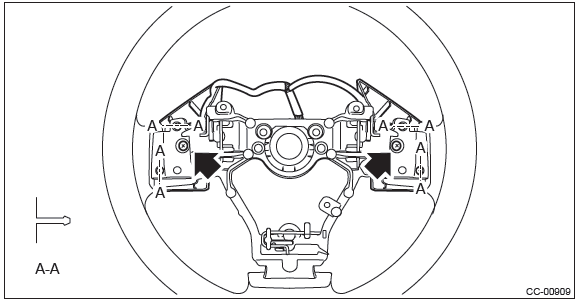
C: DISASSEMBLY
1) Remove the screw, disconnect the connector and remove the paddle shift switch. (Model with paddle shift)
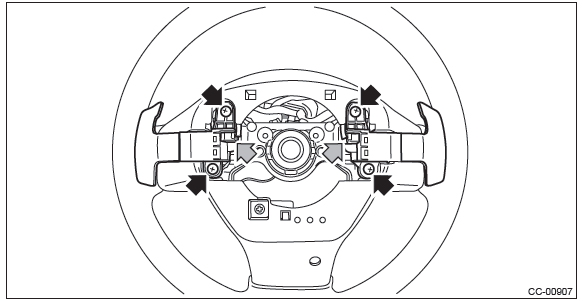
2) Disconnect the claws and then remove the lower cover.
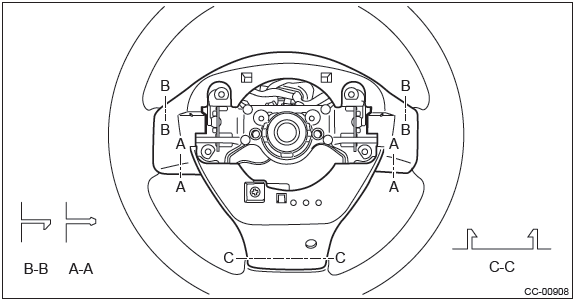
3) Remove the screw to remove the cruise control command switch assembly.
D: ASSEMBLY
Assemble each part in the reverse order of disassembly.
Tightening torque: Paddle shift: 1.7 N*m (0.17 kgf-m, 1.3 ft-lb)
E: INSPECTION
Check the resistance of paddle switch.
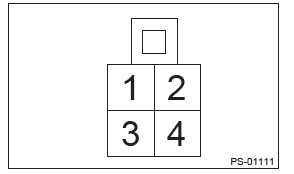
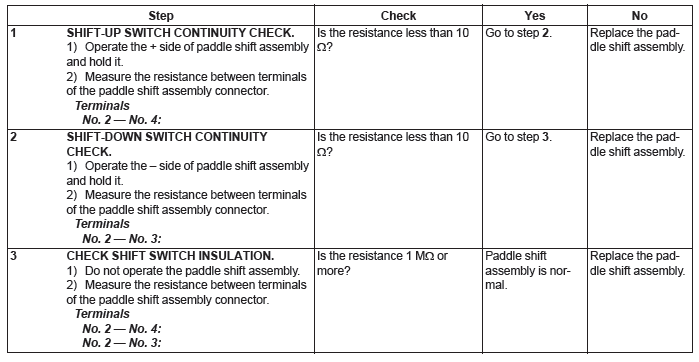
Replace the paddle switch if the inspection result is not within the standard value.
READ NEXT:
 Universal Joint
A: REMOVAL
1) Adjust the tilt position of the steering column to the lowest position and
lock the tilt lever.
2) Prevent the steering wheel from turning using the seat belt.
3) Remove the universal
Steering Column
A: REMOVAL
1) Adjust the tilt position to the lowest position and lock the tilt lever.
2) Remove the driver's airbag module assembly.
Push in the snap pin using a hexagon wrench or equivalent wrapp
Steering Gearbox
A: REMOVAL
1) Remove the cradle. <Ref. to FS-20, REMOVAL, Cradle.>
2) Remove the bolts, and remove left and right main mounting brackets.
3) Remove the bolts and remove the steering gearbox.
C
SEE MORE:
General Description of Heater, Ventilator, A/C
A: SPECIFICATION
1. HEATER SYSTEM
2. A/C SYSTEM
3. BASIC OPERATION
The cooling system cools down the compartment by using the pipes connecting parts and cycling the evaporable liquid (refrigerant) within the sealed system in a repeated process of "vaporization - liquefaction - re-vapo
Power seat (if equipped)
WARNING
To prevent the passenger from sliding under the seatbelt in the event of a collision,
always put the seatback in the upright position while the vehicle is in motion.
Also, do not place objects such as cushions between the passenger and the seatback.
If you do so, the risk of sliding
